Earth Tube Material:
When designing earth tubes, choosing the type of pipe is the first decision. There are a variety of materials to choose from, from baked clay tiles, to steel duct work, to common PVC or the most modern HDPE plastics with anti-microbial coatings… Perhaps I will eventually come back and put this in a table, but for now, I will just list some of the pros and cons to each.
Note that the thermal conduction properties of the material do affect the rate that heat conducts thru them, but it doesn’t seem to affect the overall performance of the earth tubes. Partially, this may be because the total resistance to thermal conduction includes both the R value and the thickness. Although concrete conducts heat better than plastic, concrete pipe is typically much thicker and 2 inches of concrete ends up with a thermal resistance similar to 1/4 inch of HDPE. It is also somewhat because a somewhat stable temperature gradient is setup that eventually lets the heat thru. But the real reason the material conductivity doesn’t matter very much is because it is the conductivity of the earth that is the bottleneck. Aluminum conducts heat very quickly, but can’t draw it from the earth any faster than a plastic pipe can.
More important aspects to consider include durability, cost, ease of installation, environmental concerns and the interior wall friction factor that has a direct effect on the frictional pressure losses of the system.
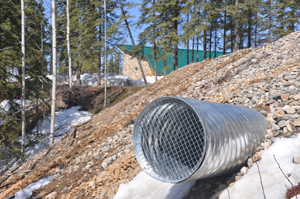
This steel earth tube helps make it affordable to heat and cool community facilities for an isolated, off-the-grid, tribe in the Yukon Territory of Canada.
Metal Ducts
Metal Ducts are commonly used in homes as part of HVAC systems, so there are a wide variety of connections/fittings available and it is not hard to put the system together yourself or to find someone to do it for you. The prices are also reasonable and it is somewhat intuitive to believe that the metal will conduct heat better (I don’t think it actually matters since the earth limits the conduction speed anyway).
However, buried metal ducts will corrode over time, particularly in moist or acidic soil, even galvanized ducts are not recommended for burial. Rectangular sheet metal ducts, commonly used for indoor HVAC systems, are particularly poor in an outdoor/underground environment where their shape does not help them resist earth loading. Their joints open up and bugs, water, earth and roots get into the pipes. While I could not find experts who recommend using regular HVAC ducting, I did find corrugated steel duct earth tubes being used in a variety of projects. Mostly these were “earth ships” in dry areas of the southern states where corrosion is less of a problem, but the attached image is of an installation used to ventilate a large First Nations (Na-Cho Nyak Dun) tribal center in the Yukon (Canada). No comments were made on the expected life of these ducts.
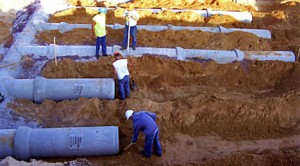
Installing Cement Earth Tubes at Aldo Leopold Center – Photo From Renew magazine
Clay or Cement
Clay or cement duct work has also been used. The idea is that if it is good enough for drainage tile or sewer systems, it is good enough for air. Their durability is not in question, however they are brittle and could be cracked with impact, most often during assembly when these heavy sections are lowered into the ground (typically with expensive equipment). The rough walls of these pipes provide a lot of resistance to airflow. The Friction factor for cement pipe is 200 times that of PVC. This friction has a direct effect on the frictional pressure losses. I suspect that the larger standard diameters can more than make up for the higher friction. The surface roughness can also make cleaning them impossible. The many joints are appreciated by bugs and mold.
It sounds like a bad idea to me, but proponents say that you can seal the joints against radon and insects while the permeability of the pipe allows moisture to escape (thwarting mold). Because many of these materials can absorb and release moisture, they can actually solve some of the humidity problems often associated with earth tubes.
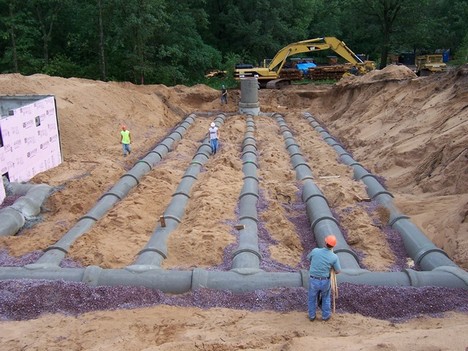
This Earth tube is approximately 600 linear feet of 2ft diameter cement pipe with rubber gasket joints. It is laid in a 5000 sq ft area, buried 10 ft below the building.
PVC (Polyvinyl Chloride)
PVC (Polyvinyl Chloride) is a frequent choice. It is popular because you can go to any hardware store and buy as much or as little of it as you want. There are also a wide variety of fittings available. You can easily buy the tools and glue needed to assemble it or find someone to do that work for you. The downside is that PVC infamous for being one of the most hazardous consumer materials ever invented. Not only is it toxic in is fabrication, but many of those production chemicals are not actually bonded in the plastic and can leak out over time. No one wants dioxin or other carcinogens in their air supply. Structurally, PVC is brittle and gets more brittle over time (especially if it spends any time in the sunlight before it is installed). It is easily broken during installation (as testified to in the blogs of many who installed them). Flexible rubber joints have been used to repair breaks and some recommend them as a way to prevent breaks (flex instead of crack). Even after a successful installation, cycling temperatures cause thermal stress and micro-fractures. The joints can catch and hold water and make the pipes difficult to clean thoroughly.
I also found it can be quite expensive (~8$/ft for 6″ Dia) compared to other options such as HDPE (~$3/ft for 6″ SDR17). Of course, there are various grades of PVC; for instance, PVC SDR 35 (thinner) Sewer pipe can be purchased for less than 3$ per foot, but it breaks relatively easily. The equivalent HDPE pipe (6″ DR 32.5 pipe) is much tougher and can also be purchased for less than 3$ per foot, but will require a couple more dollars per foot to fusion weld it together (if you hire someone else to install).
HDPE Pipe
HDPE (High Density PolyEthylene) was my favorite choice until I discovered Double Wall pipe (below). It is an inert plastic with none of the health concerns of PVC. It is also more flexible, smoother, stronger, and tougher than PVC or any other tube material I could find. This toughness is important during installation, burial and for the life of the tubes. HDPE handles the thermal cycling with ease. You can bury it and it will last as long as you need it, probably forever, but it is also recyclable. Sections of HDPE are fusion welded together in a way that results in joints that are as strong as the rest of the pipe and provide almost nowhere for water to collect. This type of pipe has the lowest friction factor available, which has a very direct impact on reducing frictional pressure losses.
One downside to HDPE is that you may need to hire a professional with the right tools to make those fusion welds. You can’t just pick up the pipe or the fusion tool at home depot and do it yourself (which was the main advantage of PVC). It comes in long pipe lengths that you will need to order in bulk and then unload when it is delivered. It also has a fairly high coefficient of thermal expansion, so if you plan to solar heat the air (as I do) flanges are recommended to prevent the HDPE from pulling itself thru the wall when it cools down.
I looked it up and noticed that the fusion welding temperature on the professional rigs was not very high (450°F), so I experimented with a piece of scrap HDPE pipe that I was given. I tried it three ways. First, I used my wife’s electric frying pan, which has a handy temperature dial. Second, I used my benzomatic torch directly. Third, to get a more even application of heat, I used the benzomatic to heat a thin piece of metal on one side and then touched the plastic to the other side…. In all three cases, I was able to soften the HDPE plastic and fusion weld it with ease. When I used the benzomatic directly, I was worried the HDPE would burn, but it didn’t. It just softened nicely. When I used the metal plate to transfer the heat, the plastic stuck a little (I over heated it past softening), but adding “parchment paper” solved that problem. The electric grill worked perfectly, but is probably overkill considering the other methods worked so well. I cut the samples up later and looked at the fusion cross sections… They looked good, although I could have gone with less softening. However, aligning the pipes was a little bit tricky. It would be good to make a simple jig for that purpose. I am pretty confident that I could do my own fusion welding for this low pressure application without hiring a pro.
Some people may prefer to have an expert fusion weld the HDPE pipes together… If you do that and want to keep your HDPE installation costs down, you will need to plan ahead more. Ordering all your HDPE for one delivery is a good idea (be ready with a fork lift to unload it), but you should also plan to have the fusion welder out for just one day. This will require organizing to make sure your trenches are dug at the right stage (after the house is cited and perhaps after foundations are poured). If you are planning for a geothermal ground loop, it would be at this same time also… You would then have all the HDPE pipe laid and fused at once. It will be important that both ends of the tubes are protected from critters from the start. These trenches will then need to be filled in (protected) before the next construction phases can begin.
Some builders create a temporary connection box to terminate the earth tubes in while other construction details are taken care of. The remaining distance to create the final connection to the house would then need to be done later and would require additional expense to mobilize the fusion equipment and operator.
It is possible to buy a 500 ft coil of 4″ HDPE pipe. At first I thought this may be a way to reduce the hassle of fusing sections together. However, an HDPE expert I was talking to told me that wrangling a 500 ft coil is very difficult and requires special straightening equipment that heats up the pipe as it is unwound, so maybe this isn’t really an option.
Another downside of HDPE is the availability of the pipe. As I noted, you can’t just walk into Home Depot and pick up a few pieces. You will need to find a proper supplier, a supplier that is used to dealing with much bigger customers (think cities or oil companies). The supplier may keep some HDPE pipe in stock, but there is a good chance the stuff you want won’t be… Larger-diameter thinner-wall pipe for low-pressure flows isn’t something a lot of people are ordering. Basically, the factory has a large extrusion pump that pushes the plastic thru a die to make the pipe. It pushes pipe out continuously and they slice off the lengths they need. When you order, you are asking the factory to stop the machine and switch dies for your order. If the factory is moderately busy, they are going to need a minimum size order to even consider doing that. It may be something like 500 or 1000 ft of pipe. You also need to wait your turn. Other customers are ahead of you and priority customers with larger orders may cut in line, so order early.
My local HDPE pipe distributor was very friendly and helpful, even though my job was small potatoes. He tried to push me towards the thicker pipe they had in stock (for higher pressure water or oil pipeline applications). He explained the factory processes and warned me that a customer order may take some time to fill. However, the thinner pipe also takes a lot less plastic and the price is about half as much. It will be easier to move around and easier to fusion weld, so maybe the hassle is worth it. I will come back and let you know how it actually works out for me.
You can buy very expensive HDPE with an anti-microbial inner coating designed specifically for earth-tubes and marketed towards people concerned about microbial growth. However, i suspect that the other properties of HDPE, particularly its very smooth walls and joints and inert chemical makeup, combined with proper installation, already prevents most of the problems and the expensive coating is not needed.
Google HDPE or try plasticpipe.org for more information.
Corrugated Drain Pipe
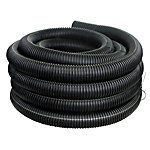
Corrugated Single Wall Drain Pipe for Earth Tubes has many good properties, but it can also hold water… So be warned!
Corrugated Drain Pipe is another polyethylene product, so, like the HDPE pipe, it is tough, long lasting, inert, etc. However, It is much thinner than HDPE, so it is corrugated to keep it from collapsing. This pipe is definitely the most flexible and lowest cost of all the piping options, which is why it has been so enormously popular for “budget” earth tube applications. It is also very commonly used in perimeter drain systems used by both conventional and earth sheltered homes.
As with the other types of pipe, the 6 inch corrugated drain pipe costs more than two 4 inch pipes (probably more due to lower production than increased cost of manufacture). You can buy “solid” corrugated drain pipe, which means it doesn’t have any holes. This is usually a better choice than the perforated or slotted pipe usually used for drainage systems. There is also “leech” pipe which has even larger holes and is commonly used in septic fields. On average, 4 inch drain pipe costs less than 40 cents a foot (2012 pricing), while 6 inch can easily get up to $1.20 per foot. You can buy large rolls, 100ft or even 200ft long. This sort of pipe is easy to install yourself, for additional savings.
Of course, there are drawbacks… In fact, I suspect that much of the bad press surrounding earth tubes comes from the use of this sort of pipe. Because the pipe is corrugated, regardless of how well it is laid, water will not fully drain out to the end. Water can sit in the corrugations. This can be worsened if it is not laid straight, which is not always easy with coiled pipe.
Using perforated or slotted pipe can help by letting that water out of each corrugation, but those holes are notorious for letting bugs and radon (and possibly more moisture or water) in. Also, the factory slotted pipe has the slots on inside ridges, so there is no draining the outside ridges (I assume this is to prevent the slotted pipe from snagging while it is uncoiled). This pipe can come with a fabric sock that will help keep plant roots and many of the larger bugs out.
Earth tube experts warn that it is better to buy solid corrugated pipe and cut your own slots. Notch each of the outward corrugations, but only on the bottom side of the pipe, so they will drain (just notch, don’t split the length of the pipe or it will collapse). Lay the pipe very carefully to make sure the notch is on the bottom. The hope is that any water droplets will have a very short distance to run before they can exit the pipe.
My wife is particularly concerned about this sort of pipe and absolutely will not let me even consider it as fresh air inlets for our home… This is a concern shared by many (and protested by others). We will be using this sort of corrugated pipe for drainage around the perimeter of our foundation. My plans for “By-Passive Solar” include earth tubes that would not go into the house, but would instead circulate solar heated air under my umbrella. The perimeter drains are already in a good place to do that second duty, I would simply need to lay them out a little differently so that I had a complete circuit and attachments to the solar air heater… I might even hook them up so they can enter the house (if I want). Design is still on going.
The corrugations also add wall friction ( very high surface roughness which leads directly to high frictional pressure losses) to this sort of pipe. If you are taking it more than a hundred feet, I recommend paying extra for the 6 inch pipe (even larger sizes would be better, but they are prohibitive expensive). If you use a duct fan, make sure it is the high pressure centrifugal type and not the low pressure axial “booster fan” type. It may not be practical for other reasons, but some suggest pushing the air (pressurizing the pipe) rather than pulling the air (reducing the pressure in the pipe). This positive pressure should help keep some things out (including Radon) rather than drawing them in.
Warning: Corrugated drain pipe seems great! It is tough, flexible, cheap, easy to install, etc. but it can also hold water (potential mold problem) so it needs to be laid very carefully.
Some experienced earth tube experts (such as Larry Larson) recommend these corrugated tubes (but at the larger 8 inch diameter) because they feel the corrugations help mix the air, which improves thermal transfer. He also says you must lay them in a serpentine pattern to help with the mixing. I assure you (see the sections on Pressure Drop and Reynolds Number calculations) that the flow will be turbulent in even the smoothest pipe. The corrugations and serpentine path will dramatically affect pressure loss (Larson mentions that you can’t even feel the air moving). Larson’s site goes into detail on other steps you need to take to keep mold an other potential hazards at bay.
Corrugated Double Wall Drain Pipe
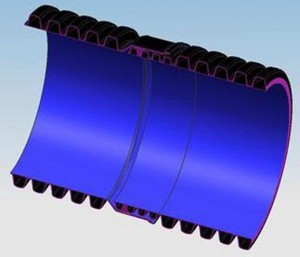 I am not the only one to notice the serious problem with draining corrugated pipe… Fortunately, some of the others were in a much better position to solve the problem. They invented “Double wall” pipe. This is pipe that has a corrugated outer surface for strength and flexibility surrounding a smooth inner wall that drains cleanly.
Since this uses much less plastic than the solid HDPE pipe, it costs quite a bit less. It also weighs much less and is more flexible, so it is easier to get into position. The best part is the press fit soil tight (water tight is also available) connections that make assembly a snap. Most brands also feature a design where the snap together mechanism works within the outside diameter.
I hunted around and found some local distributors for ADS Pipe in my area, N-12 is the product name. They both quoted me the exact same prices, so I guess price is determined by the head office. With the solid wall pipe, I needed an unusually thin wall so I needed to give weeks worth of notice to get my special order filled, but with the ADS N-12 drainage pipe, diameters from 4″ to 60″ are standard and I could get delivery in 3 days. They also had a wide range of fittings such as T pipes, etc.
Spunstrand
is a fiberglass duct type that I recently learned about. I have not had time to research it thoroughly, but it is used mainly in under-slab HVAC for commercial and industrial buildings. It is available in all the diameters and with all the fittings that you would need. I heard it was expensive, and it looks like it needs very professional installation but not sure how that cost compares to the alternatives. I will research it more when I have time.

Oleksandr Garkavtsev says:
Hello!
Indeed, it is very tempting to use a flexible two-layer HDPE pipe with a smooth inner surface. Please, pay attention to the air space between the inner and outer surfaces. This will prevent good heat transfer to the soil storage. System performance will be low. And accidentally damage the pipe will be easier than thick-walled. How do experts estimate the life expectancy of a two-layer pipe under the ground? This should be very durable, if we want to bury it under the building. By the way, the outdoor ends of the pipes are subjected to dramatic temperature extremes. For example, there are more than 120 annual intersections of 0 degrees Celsius (32F) with outdoor air in my country. The total variation is from -30 to +45 degrees Celsius (-22 … + 113F)
Thanks.
Oleksandr Garkavtsev
Simon says:
Yes, I considered this issue. Here is my logic. Lets assume that the double wall pipe is made up of alternating bands of thin HDPE plastic and insulated air spaces. Lets assume that those insulated bands are perfectly insulated and no heat is transferred thru them. This basically reduces the heat transfer surface area of the pipe by 50% when compared to a solid pipe made of that thin plastic. This is equivalent to doubling the R-value of the thin plastic over the full length. However, if we assume that the solid HDPE pipe and thin double walled pipe are made of the same material and R-value is directly proportional to thickness, and if you can agree that the solid HDPE pipe is made of much thicker plastic, it is easy math to prove that the solid HDPE pipe still has an average R-Value several times greater than the double walled pipe… Then consider that the cost of this pipe is most strongly related to the weight of the plastic, and you may agree that buying the thicker solid wall pipe is like paying for additional R-value.
However, my calculations (and calculations of others) have also shown that the R-Value of the pipe is not the bottle neck in terms of heat transfer to the surrounding earth… The pipes can usually transfer heat faster than the soil can accept it anyway.
As for durability, This double wall HDPE pipe is very durable and very commonly used across the Northern USA and Canada, and usually for more heavy-duty tasks than simply transporting un-pressurized air. This is part of the reason that it was so readily available and low cost in my area. If the same pipe is as well used in your area, then you can probably trust it for this sort of low-duty application.
When installing my double walled pipe, I found it to be very tough. I was able to cut it with a sharp blade, but it did not tear or dent and I do not think it suffered any damage from burial.
Ried says:
http://www.ask.com/web?q=plastic+welding+kits&qsrc=0&o=0&l=dir&qo=homepageSearchBox
You can purchase plastic welding kits, and with a bit of practice and study learn to make your own connections.
Nice web site and decent technical data. Thanks for putting this up!
Gilbert Prévost says:
You could use the Back&Decker workmate 125 as a jig to align 2 HDPE pipes. With the appropriate strapping I beleive that it will do the job. I see it at around $30.
Gilbert Prévost
Doug says:
I recently designed and installed a radon system and ran across this page where the first graph shows measured airflow rates vs. length of PVC pipe. This has direct application to other similarly-smooth materials. http://www.wpb-radon.com/radon_fan_performance.html#RP145
Grant says:
I used the Uponor Weholite double walled piped. I believe this is a better product to use than PVC since the Weholite comes in much longer lengths (50 ft) than PVC (8 ft) which means fewer joints that can potentially leak and also faster install. Yes there are special PVC pipe products out there which use special anti-microbial liners however these liners have a limited life expectancy. If the incoming air is filtered and the HDPE pipe is laid at a minimum 2-3 degree grade with a water collection area at its lowest point, this is typically good enough to prevent microbio growth. As a good operation/maintenance practice, the system could be flushed with water and chlorine at a concentration of about 1-2 ppm. I find HDPE is more robust, easier to install and most of all the least expensive.
Rhys says:
Have you looked at ADS’s leach field 1/2 round and their stormwater arch series. Both have an open bottom.
http://www.ads-pipe.com/images/cadthumbs/904A_Arc_36_HC_Side_Port_Coupler.png
http://www.ads-pipe.com/en/product.asp?page=arc_chambers
Larger and able to couple to standard ADS pipe are these beasts.
http://www.ads-pipe.com/en/product.asp?productID=133
If you put down geotech and gravel and put these on top it seems like a better option than just pipe. Either that or just cutting the pipe in half with a saw.
Simon says:
Why would it be better to have an open bottom? THat is probably fine if I am sending water down the pipe, but probably less ideal if I want air to flow up it.
Bo says:
The above choices seam poor and not thinking outside of the box.
My choice is to build a 10″ long concrete 15″ diameter tube array with 7 – 3″ tubes. Light weight and moves and cools lots of air. Feedback is welcome
Simon says:
10 inches long? Made of concrete? Then you say 15 inch diameter? Then you say seven 3 inch tubes? No idea what you are talking about, so tough to provide feedback. I can suggest that your choice of intro line was probably not a good one.
Kent Rice says:
I plan on building a Earth tube system for a greenhouse that is roughly 10 by 20. I would appreciate any comments anyone might have. This is exactly the information I was looking for. What Materials should I use?